The Ultimate Guide to Storing and Organizing Workshop Hardware: Nuts, Bolts, and Screws


In every well-run workshop, organization is key. A well-organized workshop is an efficient workshop. Few things are more frustrating than stopping a project midway to search for a specific screw or bolt you know you have somewhere. A systematic approach to storing your hardware not only saves you time and money but also reduces project-related stress. Whether you're a weekend warrior or a full-time tradesperson, keeping track of nuts, bolts, and screws can save you time, money, and frustration. This guide will walk you through the best hardware storage solutions for DIYers to help transform your chaotic workspace into an efficient haven of productivity.
Key Takeaways
- Sort and Purge Before You Organize: The essential first step is to dump all your hardware out and categorize it by type, size, and thread. This is also the perfect time to get rid of the miscellaneous, rusted, and single-use fasteners that you'll likely never use, freeing up space for the items you actually need.
- Use a Variety of Clear, Right-Sized Containers: Avoid the one-size-fits-all trap. Use small, portable, compartmentalized organizers for frequently used screws and nails that you might carry to a job site. For stationary storage, modular drawer units or tilt-out bins are excellent for nuts and bolts. Using clear containers or those with a transparent front allows for quick visual identification.
- Label Everything for Quick Identification: Meticulous labeling is crucial to prevent you from opening every drawer and bin. For an even more efficient system, consider gluing a sample of the hardware to the front of its respective container. This visual cue is faster to read than a text label.
- Organize Based on Frequency of Use: Apply the 80/20 rule to your workshop. Keep the 20% of hardware that you use 80% of the time in the most accessible locations, such as within arm's reach of your workbench. Bulk storage and less common items can be placed on higher shelves or in less convenient cabinets.
- Maximize Vertical Space to Keep Workbenches Clear: Utilize your walls to get hardware off your primary work surfaces. Wall-mounted bin racks, pegboards with hanging containers, and stackable drawer systems are all effective ways to create a dedicated, organized hardware station that doesn't clutter your workspace.
Know Your Needs: Assessing Your Hardware Collection
The "best" storage solution is entirely dependent on the size of your collection and how you work. Before you buy a single container, take a moment to evaluate your inventory and workflow.
For the Weekend Warrior: Small, Portable Solutions
If you're a DIY enthusiast who tackles occasional home repairs or small projects, your collection of fasteners is likely modest. Your priority should be a system that is simple, contained, and easy to store away when not in use.
For the Serious Hobbyist: Scalable and Accessible Systems
Woodworkers, mechanics, or dedicated makers often have a rapidly growing and diverse collection of hardware. You need a system that can grow with your inventory. Accessibility is key, as you'll be reaching for different fasteners frequently.
For the Professional: High-Density and Efficient Organization
For professionals, time is money. Your storage system must maximize efficiency and density. It needs to hold a vast quantity of hardware in an organized fashion that allows for quick identification and retrieval, minimizing downtime.
Top Hardware Storage Solutions Compared
There are four primary methods for storing hardware, each with distinct advantages and disadvantages.
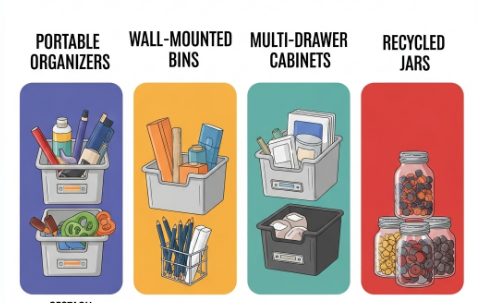
Infographic of a Visual Comparison of the Four Main Hardware Storage Solutions: Portable Organizers, Wall-Mounted Bins, Multi-Drawer Cabinets, and Recycled Jars
Portable Parts Organizers (The "Grab-and-Go" Method)
These are typically suitcase-style plastic containers with multiple, often configurable, compartments and a clear lid.
- Description: Think of a tackle box for hardware. Brands like DeWalt (Tstak), Milwaukee (Packout), and Stanley offer a range of sizes, many of which are stackable and interlocking.
- Pros: Excellent portability, relatively inexpensive to start, stackable systems save space, and clear lids allow for quick visual identification. They keep parts separated and secure during transport.
- Cons: Can become costly and cumbersome as your collection grows. You might end up with dozens of individual cases, making it hard to find the specific one you need.
- Best For: Beginners, professionals who need to carry specific hardware to a job site, or for organizing small, project-specific kits.
Wall-Mounted Bins and Panels (The "Visual" Method)
This system uses louvered panels or pegboards to hang open-front plastic bins.
- Description: Bins of various sizes are hung on a wall-mounted panel, allowing you to create a custom layout. This keeps your most-used hardware visible and within arm's reach.
- Pros: Highly visible and accessible, infinitely customizable, and makes it easy to grab a handful of fasteners. It utilizes vertical wall space effectively.
- Cons: The open bins are notorious dust collectors. It requires dedicated wall space, and the cost of panels and a large number of bins can add up. It is not portable.
- Best For: Workshops where wall space is plentiful, for storing frequently used items, and for those who prefer to see their inventory at a glance.
Multi-Drawer Cabinets (The "High-Density" Method)
These are cabinets, either metal or plastic, containing stacks of small drawers.
- Description: Often called parts cabinets or drawer organizers, these units offer a high-density storage solution. They come in various configurations, from small desktop units to large, floor-standing cabinets.
- Pros: Extremely space-efficient, protects hardware from dust and debris, and provides a clean, uniform look. The ability to label each drawer creates a highly organized system.
- Cons: You can't see what's inside without opening the drawer or reading the label. The initial sorting and labeling process can be time-consuming. They are not easily portable.
- Best For: Storing a large and diverse collection of hardware, workshops with limited wall space, and anyone who prioritizes organization and cleanliness.
Jars, Cans, and Recycled Containers (The "Budget" Method)
This classic DIY approach involves repurposing containers like baby food jars, coffee cans, or peanut butter jars.
- Description: A simple, no-frills method where hardware is sorted into various recycled containers and stored on shelves.
- Pros: The cost is virtually zero. It's a great way to get started and is perfect for storing odd-sized or bulky items that don't fit in standard organizers.
- Cons: Highly inefficient in terms of space. Round jars waste a significant amount of shelf space compared to square containers. It can be difficult to find a specific item, leading to the "hunt and shake" method.
- Best For: Hobbyists on a very tight budget, storing small quantities, or for those who appreciate a rustic, old-school workshop aesthetic.
The Comparison: Which Storage System is Right for You?
|
Feature |
Portable Organizers |
Wall-Mounted Bins |
Multi-Drawer Cabinets |
Recycled Jars |
|
Space Efficiency |
Moderate |
Low (Uses Wall) |
High |
Very Low |
|
Cost |
Low to Moderate |
Moderate to High |
Moderate to High |
Very Low |
|
Portability |
High |
None |
Low |
Low |
|
Accessibility |
Moderate to High |
High |
Moderate (Requires Labels) |
Low |
|
Scalability |
Moderate |
High |
High |
Low |
|
Protection |
High |
Low (Dust) |
High |
Moderate |
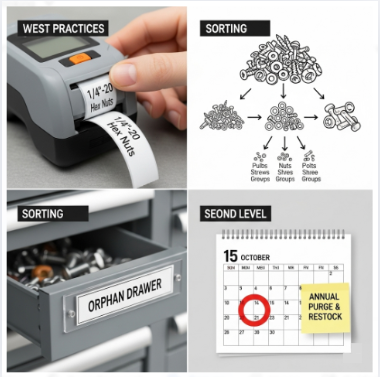
Best Practices for a Flawlessly Organized System
Infographic of a Visual Guide to Best Practices for a Flawlessly Organized System
Choosing a system is only half the battle. Maintaining it is what makes it work.
The Magic of Labeling
For any system with non-transparent containers, labels are non-negotiable. A simple label maker is a fantastic investment. Be specific: "1/4"-20 Hex Nuts" is much better than "Nuts."
Sort by Type, Then by Size
The most effective sorting method is to first group by the type of fastener (e.g., wood screws, machine screws, hex bolts) and then subdivide those groups by size (diameter and length).
The "Orphan" Drawer
No matter how organized you are, you'll always have leftover, unidentified, or one-off fasteners. Dedicate a single "miscellaneous" or "orphan" drawer for these. It prevents them from cluttering your organized bins.
Regular Purges and Restocking
About once a year, take a few minutes to go through your collection. Consolidate nearly empty containers and make a list of common items you're running low on.
Ultimately, the best way to store your hardware is the system you will consistently use. Whether it's a high-end modular cabinet or a simple set of labeled jars, an organized approach will transform your workshop experience, allowing you to spend less time searching and more time creating.
Best Hardware Storage Solutions for DIYers
Modular Drawer Systems
Investing in a multi-drawer parts cabinet organization system is a game-changer. These units offer dozens of clear, labeled drawers that make finding the right fastener effortless. You can sort by size, material, or type for maximum efficiency.
Stackable Portable Organizers
For those who move between job sites or prefer flexibility, a stackable portable organizer for screws and other small items is ideal. These containers come with individual compartments and secure lids that keep contents in place even during transport.
Multi-Drawer Parts Cabinet Organization Tips
Label Everything
Whether you’re using drawers, bins, or boxes, clearly label each compartment. Include the type, size, and quantity if possible.
Arrange by Frequency of Use
Place the most frequently used parts in easily accessible drawers. Reserve less common items for higher or lower drawers.
Color Coding
Use color-coded labels or bins to instantly identify different hardware types, making your multi-drawer parts cabinet organization more intuitive.
Frequently Asked Questions (FAQs):
- What's the absolute first step to organizing a huge, messy collection of screws and bolts? The first and most crucial step is to dump everything out and do a thorough sort. Before you buy any containers, you need to know what you have. Create broad categories first (e.g., screws, nuts, bolts, washers, anchors) and then sub-categorize by type (e.g., wood screws, machine screws) and then by size. This is also the best time to purge items you'll never use, like single rusty bolts or stripped screws.
- What are the best types of containers for storing hardware? There's no single best container; it depends on your needs. For visibility and accessibility, clear, modular drawer units are a top choice. For portability, look for compartment organizers or caddies with secure latches and adjustable dividers. Wall-mounted bin systems are excellent for saving bench space and keeping frequently used items within reach. Many people find a combination of these solutions works best.
- How should I categorize my hardware? By size, type, or project? For long-term, versatile organization, it's best to organize by type, then size. For example, have one drawer for "Wood Screws" with compartments for different lengths, and another for "Hex Bolts" sorted by diameter and length. Organizing by project is only a good idea for short-term kits; otherwise, you'll end up buying duplicates when you can't find the specific screw you need later.
- What's the best way to label containers so I can find things quickly? Clear, consistent labeling is key. Use a label maker for neat, easy-to-read text. For the ultimate quick-glance system, hot glue a sample of the hardware directly onto the front of its bin or drawer. This visual cue is often faster to recognize than reading a label, especially for similar-looking items.
- I have a "junk drawer" full of miscellaneous hardware. What should I do with it? Be ruthless. Sort through it and decide if you really need to keep those random, unidentified items. Most of the time, the answer is no. If you can't bring yourself to throw them away, create a single, clearly labeled "Miscellaneous" or "Catch-All" bin. This keeps them contained and prevents them from cluttering up your main, organized system.
- How can I store hardware if I have very limited space? Maximize your vertical space. Wall-mounted solutions like pegboards with small hanging bins, magnetic strips for holding loose screws temporarily, or shelving units for stackable organizers are your best friends. Another classic space-saving trick is to screw the lids of jars to the underside of a shelf, then fill the jars with hardware and screw them into the attached lids.
- Once I'm organized, what's the secret to keeping it that way? The secret is discipline and routine. Make it a habit to put things back in their designated spot immediately after you're done with them. Dedicate just 5-10 minutes at the end of each work session to tidying up. When you bring new hardware home, don't just toss it on the bench; take the extra minute to put it into its proper container right away.
Related Articles:
- Conquer Your Chaos: The Guide to Workshop Organization
- How to Organize Your Workshop Efficiently
- The Ultimate Guide to Workshop Storage: Ideas, Layouts & Organization Tips
- How to Create a Tool Storage System for Your Workshop
- Workshop Tool Storage Solutions: Organize and Store Your Tools Efficiently
Conclusion
Ultimately, transforming chaos into order is about reclaiming your time and reducing the frustration that comes from a disorganized workspace. Whether you're figuring out how to organize screws and nails in a small garage or tackling a professional setup, the principles are the same. It starts by committing to the task of how to sort a large mixed collection of fasteners. Once you know what you have, you can find the best storage containers for nuts and bolts for your specific needs, from simple DIY hardware storage ideas for a workshop to professional-grade systems.
The real game-changer is often implementing wall-mounted storage solutions for small parts, which gets clutter off your primary work surfaces and is key to organizing a workbench for nuts and bolts effectively. Taking the time for proper storage also has the added benefit of preventing rust on screws and bolts in storage, protecting your investment. And don't forget to figure out how to label hardware bins for quick access; a simple label or a sample fastener glued to the front can save you countless minutes. For those on the move, a dedicated portable hardware organizer for job sites ensures you have what you need, wherever you are.
In the end, a well-organized hardware system means less time searching and more time creating. It’s the satisfaction of knowing exactly where that one specific fastener is the moment you need it, turning a potential headache into a seamless part of your project.
Call to Action
Ready to Upgrade Your Workshop Organization?
Discover the best hardware storage solutions for DIYers today at TendSupplies.com! Whether you're looking for cheap nut bolt storage ideas, a reliable multi-drawer parts cabinet organization system, or a stackable portable organizer for screws, we’ve got everything you need to keep your workspace efficient and clutter-free.
Bulk orders? Custom needs? Reach out to us at sales@tendsupplies.com, our expert team is here to help you build the perfect storage solution!

Newest Guide & products Updates

The Technical Evolution of Automotive Electronics: Why Professional Dashcam Hardwiring is No Longer Optional
Why Professional Dashcam Hardwiring is No Longer Optional The automotive industry is undergoing a m...

Mobile Storage for Flexible Workshops: The Stackable Rolling Storage Crate System
Modern workshops are rarely static. Projects change, workflows evolve, and the need for a flexible,...

The Grab-n-Go Mechanics Kit: The Hi-Spec 67-Piece Car Tool Kit Review
Not every repair happens in the comfort of a fully stocked garage. Breakdowns can happen anywhere, a...

Get Your Tools Off the Floor: The Power of a Wall-Mounted Tool Organizer Rack
Leaning in a corner of every garage is a familiar sight: a chaotic jumble of brooms, rakes, shovels,...

Revolving Storage for Small Parts: The UNITEDPOWER Rotating Hardware Storage Bin Solution
For the dedicated hobbyist, electronics enthusiast, or meticulous crafter, the challenge is always t...

Declutter Your Workshop: The Magic of a 30-Bin Wall-Mounted Storage Organizer
A messy workshop is an inefficient one. Time wasted searching for the right screw, nut, or washer is...