How To Create a Tools Storage System for Your Workshop


An organized workshop is an efficient workshop. A well-planned tool storage system not only saves you time and frustration but also protects your valuable tools from damage. This guide will walk you through creating the perfect tool storage system for your workshop, with specific solutions for every type of tool.
This guide is designed to help you reclaim your space. We will cover everything from foundational layout principles to clever storage ideas and the organizational habits that keep a workshop efficient for the long haul. Whether you're setting up in a sprawling garage or a compact basement corner, this guide delivers proven garage workshop organization strategies that balance function with safety. From wall-mounted systems to the best tool cabinets, get ready to overhaul your workshop for good.
Key Takeaways
Plan Your Layout Around Work Zones: Before buying storage, design your workshop layout around key activity areas (such as a "workshop triangle") to minimize movement and create an efficient workflow between your workbench, cutting stations, and tool storage.
Maximize Vertical Space: Your walls are your most valuable storage asset. Use systems such as pegboards, French cleats, and magnetic bars to keep tools off your benchtops and keep them visible, accessible, and organized.
Assign a "Home" for Every Item: The core principle of a tidy workshop is that every tool, fastener, and piece of material has a designated storage spot. Adopting the habit of immediately returning items to their homes after use helps prevent clutter from accumulating.
Implement the "One-Touch" Rule: Organize your tools so you can identify and retrieve them in a single motion. Avoid stacking boxes or burying items; moving multiple items to reach a single tool is a sign of an inefficient system.
Invest in Mobile Storage: Rolling tool chests and carts provide flexibility and convenience.
The Foundation: Planning Your Workshop Layout for Maximum Efficiency
Before you buy a single storage bin, you need a plan. A practical layout minimizes unnecessary movement and ensures that your space works with you, not against you. The key is to think in terms of "work zones."
Understanding the "Workshop Triangle"
Similar to the "kitchen triangle," the workshop triangle connects your three most-used areas. Typically, these are:
- Your primary workbench: Where assembly and detail work happens.
- Your main cutting station: Such as a miter saw or table saw.
- Your tool storage: The main cabinet or wall where you grab most of your tools.
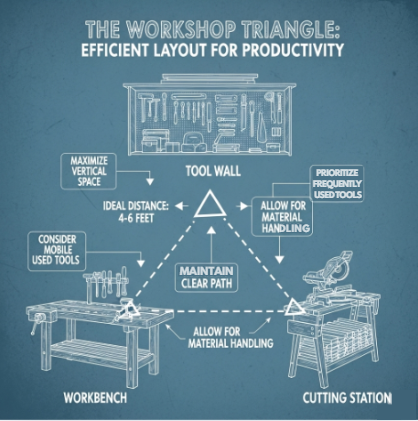
Infographic Showing Workshop Triangle Layout
By arranging these three points in a compact, unobstructed triangle, you drastically reduce the number of steps you take and create a natural, efficient workflow.
Creating Dedicated Work Zones
Group your tools and materials based on the type of work you do. This creates logical "zones" in your workshop.
- Cutting & Milling Zone: Place your table saw, miter saw, and planer here. Include storage for raw lumber and a dedicated dust collection port.
- Assembly & Finishing Zone: This should be centered around your main workbench. Keep glues, fasteners, clamps, and finishing supplies within arm's reach. This area needs good lighting and ventilation.
- Hand Tool & Power Tool Storage Zone: This is where your main tool chests and wall storage will live. It should be centrally located for easy access from all other zones.
- Project & Material Storage Zone: A dedicated area for raw materials (lumber, metal stock) and projects that are in progress but not actively being worked on.

Pegboard Systems
Wall Cabinets
Wall Storage: Getting Tools Off the Bench
- Pegboard: The classic choice for a reason. It's affordable, endlessly customizable, and perfect for irregularly shaped hand tools. Use high-quality locking hooks to prevent items from falling.
- French Cleats: A highly versatile and strong system. A French cleat wall consists of interlocking 45-degree angled boards, allowing you to build and hang custom tool holders, shelves, and cabinets that can be easily rearranged.
- Magnetic Tool Bars: An excellent solution for frequently used metal tools like wrenches, screwdrivers, and pliers. They provide instant, visible access.
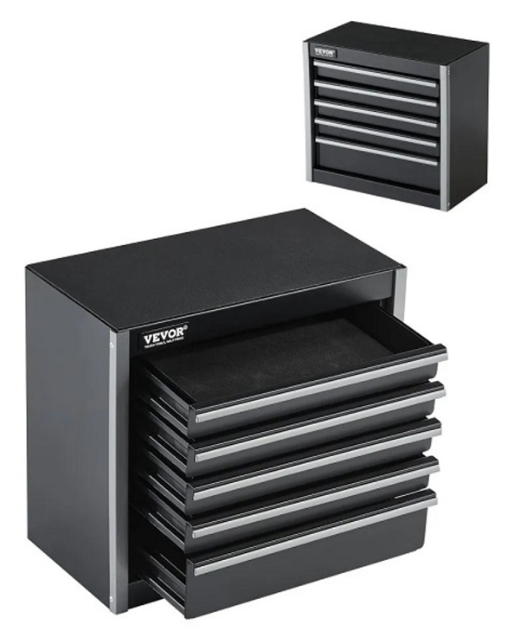
Tool Chests and Rolling Cabinets
A quality tool organizer not only keeps your workspace tidy but also improves workflow by ensuring tools are always in the right place. Consider integrating workshop shelving for bulk storage and a modular toolbox setup to maintain mobility.
When shopping for the best workshop tool cabinets, look for features such as ball-bearing drawers, heavy-duty casters, and modular storage options that can expand with your needs. A rolling tool chest is the command center of many workshops.
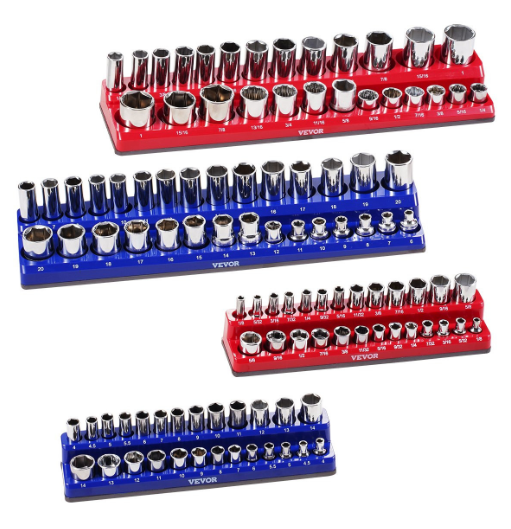
- Shallow Drawers: Use these for precision instruments, wrenches, and screwdrivers. Use drawer dividers or foam inserts to keep everything organized and prevent rolling.
- Deep Drawers: Perfect for bulkier power tools like circular saws, drills, and sanders.
- Mobility is Key: A rolling cabinet allows you to bring your entire tool arsenal directly to your project, whether it's in the garage or the driveway.

An Infographic Showing a Modular Tool Chest System, its Component and Uses
Clever Storage for Awkward Items
- Lumber Storage: Store lumber vertically in a dedicated rack to save floor space and prevent bowing. For smaller offcuts, build a partitioned rolling cart that you can tuck under a workbench.
- Clamp Racks: Don't let your clamps become a tangled mess. Build a simple wall-mounted rack to keep them organized and easy to grab.
- Hardware and Fasteners: Use clear, stackable containers or wall-mounted bin systems. Label everything! There is nothing more frustrating than searching for a specific screw. Small parts organizers or even repurposed jars work perfectly.
The System: Organization Tips for Long-Term Success
Excellent storage is useless without a system. These habits are what separate a permanently organized workshop from one that's clean for a week.
"A Place for Everything, and Everything in Its Place"
This isn't just a saying; it's the core principle of workshop organization. Every single item, from your most expensive table saw to the smallest washer, must have a designated home. When you are finished with a tool, it goes back to its home immediately.
The "One-Touch" Rule
Structure your storage so you can identify and grab any tool in a single motion. Avoid stacking boxes or burying tools behind one another. If you have to move three things to get to one tool, your system is failing. This is why visible storage like pegboards and French cleats is so effective.
Regular Purging and Reset
A workshop is a dynamic space. Once every six months, take 30 minutes to evaluate your setup.
- What haven't you used? If a tool has been collecting dust for a year, consider selling or donating it.
- What isn't working? Is there a drawer that's always a mess? A tool that's hard to get to? Re-evaluate and find a better solution.
- Perform a "hard reset." Take 15 minutes at the end of every project to put every tool away and sweep the floor. Starting your next project in a clean space is a massive motivator.
By combining a thoughtful layout, smart storage solutions, and disciplined organizational habits, you can transform any cluttered space into a highly efficient and enjoyable workshop. A well-organized shop not only makes your work faster and easier, it respects the craft and provides a safe, inspiring environment for you to create your best work.
Frequently Asked Questions (FAQs)
- I have a very small workshop, like a corner of a garage. What's the most important tip for me?
For a small space, the single most important tip is to maximize your vertical space. Get as much as you can off the floor and benchtops by using wall-mounted solutions like pegboards, French cleats, or simple shelves. Additionally, invest in mobile storage, like a rolling tool cart or a workbench on casters, which allows you to reconfigure your limited space easily depending on the project you're working on.
- What's the best way to get organized on a tight budget?
You don't need to spend a fortune to get organized. The most budget-friendly and effective solution is a DIY French cleat system. All it requires is some plywood, which allows you to build custom holders for all your tools. You can also repurpose household items like glass jars for screw storage and build simple lumber racks from scrap wood.
- I can never find the right screw or nail. What is the absolute best way to store small hardware?
The best system for small hardware is one that is clear and labeled. Use transparent, stackable containers or wall-mounted bin systems so you can see the contents at a glance. For maximum efficiency, group similar items together (e.g., all wood screws, all metric bolts) and clearly label each drawer or bin. This eliminates guesswork and saves a massive amount of time.
- The article mentions pegboard and French cleats. Which one should I choose?
It depends on your needs. Pegboard is cheaper and faster to set up, making it great for beginners and for hanging lighter, oddly-shaped hand tools. French cleats are stronger and infinitely more customizable, making them the superior choice for hanging heavy items, custom-built cabinets, and entire tool systems that you may want to rearrange later. Many workshops use a combination of both.
- How do I handle storing long pieces of lumber and awkward offcuts?
For long boards, a vertical wall-mounted lumber rack is the most space-efficient solution. It keeps wood off the floor and prevents it from bowing. For smaller offcuts, a rolling partitioned cart is an excellent solution. You can build one from scrap plywood and slide it under your workbench, allowing you to easily sort through pieces and bring them to your saw.
- My main problem is keeping the workshop clean. How do I stop it from getting cluttered again right after I organize it?
The key is to build disciplined habits. The two most important are the "a place for everything" rule and the end-of-project reset. Get in the habit of putting every tool back in its designated home immediately after you are finished with it. Secondly, take 15 minutes after completing any project to do a "hard reset" put everything away and sweep the floor. Starting the next project in a clean space is the best way to maintain organization.
- Is a big rolling tool chest really necessary?
While not strictly necessary for everyone, a rolling tool chest is highly efficient because it centralizes your most-used tools and makes them mobile. It allows you to bring your entire arsenal to your project, saving countless trips back and forth. If a large chest isn't feasible, you can achieve a similar effect with a smaller rolling tool cart or by creating a well-organized "hand tool wall" right next to your primary workbench.
Related Articles:
- How to Organize Your Workshop Efficiently
- The Best Tool Storage Solutions for Small Workshops: Maximizing Space and Organization
- How to Create a Tool Storage System for Your Workshop
- Essential Workshop Layout Tips: Organizing Your Tools for Maximum Efficiency
Conclusion
Visit Tendsupplies.com to find all the workshop storage and organization solutions you need to build a more efficient workspace.

Newest Guide & products Updates

Mobile Storage for Flexible Workshops: The Stackable Rolling Storage Crate System
Modern workshops are rarely static. Projects change, workflows evolve, and the need for a flexible,...

The Grab-n-Go Mechanics Kit: The Hi-Spec 67-Piece Car Tool Kit Review
Not every repair happens in the comfort of a fully stocked garage. Breakdowns can happen anywhere, a...

Get Your Tools Off the Floor: The Power of a Wall-Mounted Tool Organizer Rack
Leaning in a corner of every garage is a familiar sight: a chaotic jumble of brooms, rakes, shovels,...

Revolving Storage for Small Parts: The UNITEDPOWER Rotating Hardware Storage Bin Solution
For the dedicated hobbyist, electronics enthusiast, or meticulous crafter, the challenge is always t...

Declutter Your Workshop: The Magic of a 30-Bin Wall-Mounted Storage Organizer
A messy workshop is an inefficient one. Time wasted searching for the right screw, nut, or washer is...

Proper Torque for Perfect Fastening: Why a 1/2-Inch Drive Torque Wrench is Essential
In automotive repair and mechanical work, the idea of tightening a bolt until it feels “good-n-tight...